
How Do You Measure Up? Part 3: The Difficult Phase
There’s more to phase than just flipping it. Here’s how to read phase when it starts getting shifty.
When I first started using a measurement system, I would hide the phase response because I had no idea what it meant. It wasn’t until someone actually spent the time to show me how the phase trace worked that I realised how useful a tool it is. These days I wouldn’t consider measuring a sound system without it.
We understand the concept of frequency response long before we become sound engineers. Every music listener can hear the effect of turning the treble or bass dials. On the other hand, it’s virtually impossible to determine the phase response of a signal just by listening to it.
Don’t worry, in the realm of system design and alignment, the audibility of the phase response of a single source is the least of your worries. What is going to be really useful is learning how phase plays a role when two or more sound sources interact.
PAST THE DIFFICULT PHASE
A sound engineer’s first encounter with phase is generally in the form of a polarity inversion, which flips the phase 180° at all frequencies. Things usually go astray when we start talking about phase shift.
In reality, phase isn’t actually hard to understand. You were probably well underway to understanding it in you first audio lesson, you just may not have learnt how to apply it in the real world.
Let’s start with the sine wave. It has a frequency, amplitude and phase component, and in our case, represents the compression and rarefaction of air particles created by a sound wave. Easy, right? Well the problem is, that’s where most explanations of phase stop, so we struggle to translate theory into the real world where signals are anything but pure sine waves.
The connection between sine waves and the real world lies with a long deceased Frenchman by the name of Jean-Baptiste Joseph Fourier. Sound familiar? Probably because Fourier is the middle ‘F’ in FFT (Fast Fourier Transform), the type of algorithm used in most measurement systems today. What Mr Fourier discovered way back in the early 1800s is that a complex waveform can be broken down and represented by a series of simple sine and cosine waves. This goes for anything we hear, it doesn’t matter if it’s a cello or a heavy metal band, if we look at a single moment in time, we can break down that signal into individual frequencies and calculate the amplitude and phase at each of those frequencies. Even distortion components like square waves can be broken down into an infinite sum of sine waves.

ONE FREQUENCY AT A TIME
If you’re ever overwhelmed by phase, remember that even measurement systems and loudspeaker simulation programs do their work one frequency at a time. When you look at your transfer function, the measurement system has used this Fourier Transform to break down the signal into its individual frequency components and calculated the amplitude and phase shift for each of those frequencies. It then plots this information on our transfer function graph and essentially ‘joins the dots’.
When we look at loudspeaker simulation software, for example, the software has not only done all the calculations one frequency at a time, but it has made each of these individual calculations for every sound source, one position at a time. It can then sum the results at each individual frequency to display them over a wide bandwidth (e.g. Full range A-weighted or 2-8kHz).
The easiest way to wrap your head around complex phase interactions is to think like your computer — one frequency at a time, one position at a time. Once you understand this concept, everything gets much simpler to grasp.
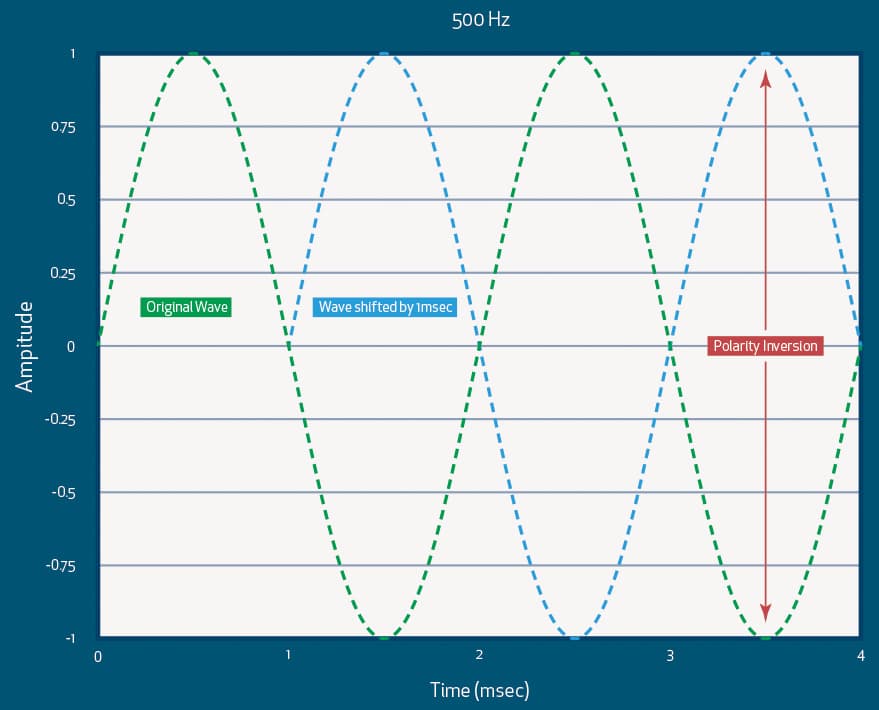
Before we get out our measurement kits, let’s start by looking at the simplest of phase shifts — the time delay. If we shift a wave in time, we will shift its phase relative to the original wave.
What does this mean to us in the real world? Well, for a single source and a time delay, absolutely nothing. We’re only talking about ‘relative’ phase here. No amount of time delay to a single source will change the way that source sounds, only when it arrives. Where this information becomes useful is when we need to add it to another sound source. Knowing the relative phase shift between two sources is crucial in determining how they interact.
When I first started using a measurement system, I would hide the phase response… These days I wouldn’t consider measuring a sound system without it
PHASE, IT’S ALL RELATIVE
It’s almost time to get out our measurement systems, but first we must understand how the phase trace is calculated. When phase is displayed on a transfer function, we’re looking at the phase response of the measured signal shown relative to the reference signal. Your measurement system should have the ability to calculate the delay of a measured signal relative to a reference and then insert that delay into the measurement system. If you don’t do this your phase trace probably looks like a jumbled mess.
When you press this delay finder button, the measurement system takes an impulse response of the system. It finds the initial time arrival using the initial peak of the impulse response, and adds that delay to the reference signal so now the measured signal and reference signal arrive at the measurement system at precisely the same time. It then compares the two signals and gives us the magnitude (frequency) response and phase response of the measured signal, relative to the reference signal.
When the measurement system displays phase, it does it in a -180° to +180° window. The reason for this -180° to +180° window is because measurement systems break a signal down into individual sine/cosine waves before displaying it, and since a sine or cosine wave with a 360°, 720°, 1080°, etc phase shift looks identical to the original wave, the measurement system cannot determine if the wave has gone past this 360° window. This is what we call ‘wrapped’ phase response.
GETTING SET UP
We’re going to use our example of a 1ms delay and look what that does to the phase response of our signal, but first we need to get set up. The best way to do your initial phase measurements is electronically (i.e. not using loudspeakers), since the loudspeakers and environment will cloud your results. You’ll need to take the noise signal from your measurement system, split it into two channels, process them independently, then combine those two signals back into one, and feed that into your measurement system.
If you work in live sound, grab a Y-cable, a speaker processor with the ability to adjust delay on each band and a mixing console to mix the two channels back into one. If you work in installations, a configurable audio DSP that can mute, delay and mix internally will work a treat. Since we’re making electronic measurements, you can turn off your trace smoothing and averaging.
First, we’re going to look at a single full range signal, so mute one of the channels. Run your measurement noise signal through your processor/DSP setup and back into the measurement system. There will be some form of small delay through the system, so run your delay finder and insert the delay. If your gain is adjusted right — and your system is free of filters (intentional or otherwise) — you should see two straight lines; one in the frequency display at 0dB and another in the phase display at 0°.
If your phase trace is sitting on the 180° line then you have a polarity inversion (relative to your reference) somewhere in your signal chain. Make sure your frequency response is sitting at 0dB and the phase response graph is centred so that 0° is in the middle with -180° at the bottom and +180° at the top. This will make it easier to read relative differences later on. Don’t be deterred if your phase trace isn’t perfectly flat at the extreme low and high frequencies, some electronics will have a slight phase shift at either end of their frequency spectrum. As long as it’s flat for most of the useable frequency range it will be fine.
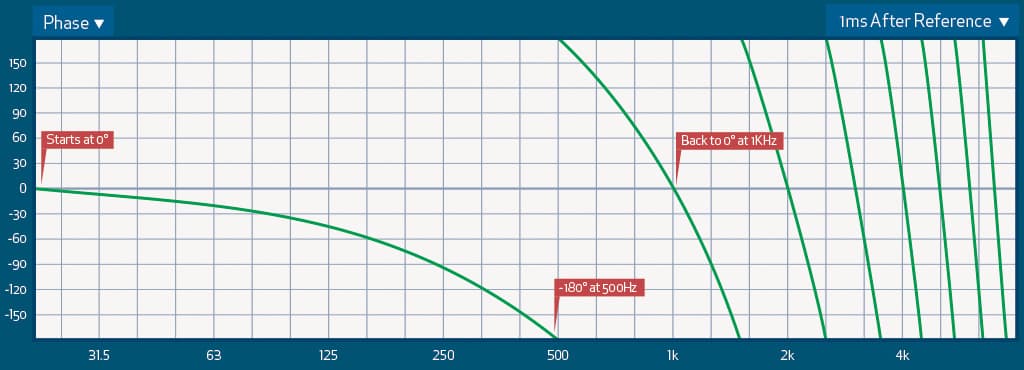
Now insert a 1ms delay into your crossover or DSP. You must leave the internal measurement system delay the same, so if you have an auto tracking delay function that recalculates the reference delay every time the signal moves, you’ll need to ensure this is turned off. The frequency response should stay the same but the phase response should have shifted to a line that slopes downwards from low to high frequencies. When it reaches -180° it disappears and pops out at the same point at the top of the screen (+180°) and continues like this getting steeper and steeper as you go higher in frequency. This is the ‘phase wrap’ occurring. Older Smaart systems continue the line directly between the top and bottom point (which creates a kind of ‘shark fin’ or sawtooth looking trace) but these vertical lines actually serve no purpose, so I prefer it without them.


Going back to our example, a 1ms delay should give us a 180° phase shift at 500Hz, so let’s compare that to our phase trace. We can see that the line starts around the 0° mark in the lowest frequencies and then slopes downwards until it hits the -180° point at precisely 500Hz. If we continue along that line, which should now start again from the top of the screen, it should continue downwards crossing the 0 deg line at precisely 1kHz. This is because the time period of 1kHz is exactly 1ms, so a 1ms late arrival is phase shifted by 360° at 1kHz. Since this is the first time it has ‘wrapped’ around and passed the 0° mark again, we know that a 360° phase shift has occurred. The second time it crosses the 0 deg line is at 2kHz meaning that 2kHz has a phase shift of 720° relative to the reference signal. Since 2kHz has a time period of 0.5ms, this makes sense.
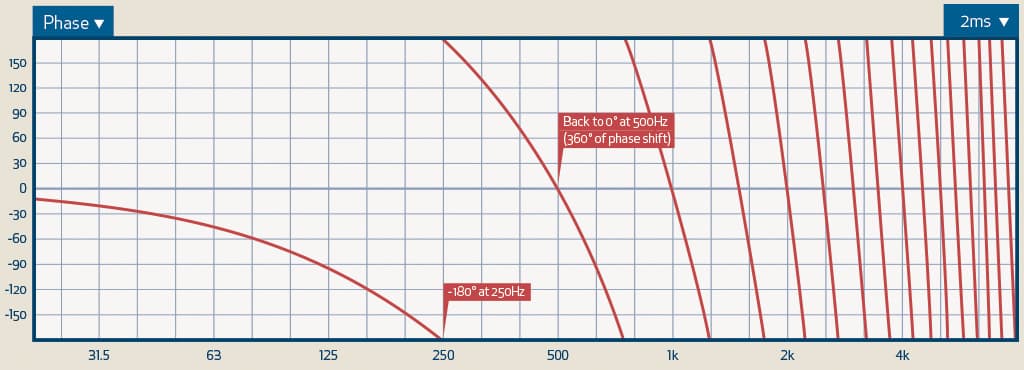
Now capture that trace and increase the time delay in your processor to 2ms. What we can see is that the phase trace is now much steeper and wrapping from -180° to +180° more often. Let’s again follow the trace from the lowest frequencies to the point it first hits the -180° mark. This should be at 250Hz. We should know from our previous example that 250Hz has a time period of 4ms, so a 2ms delay would put the phase shift at 180°. Understanding that the phase trace becomes steeper when the measured signal moves further away from the reference signal will be important down the track, so try and ingrain this in your memory.
Now what happens when the measurement trace is earlier than the reference signal? Since there’s no way to add negative delay to your processor/DSP, we’ll need to add delay to the internal reference delay in our measurement system. Since we should now have 2ms in our processor/DSP, take note of the reference delay in your measurement system, and now add 2ms to that number (NB: don’t simply enter 2ms, you will need to add 2ms to the time already stored as your reference delay). This should bring your measured signal and reference signal back into alignment and the phase trace should return to the 0° line.
Take note of this. The sound source has not moved at all, just the internal reference in the measurement system.
Now add a further 1ms to the internal reference delay in your measurement system. You should see a line that is a mirror image of the previous trace with 1ms on the measured signal that moves upwards from the low frequencies and hits its +180°mark exactly at 500Hz. This upward slope means your measured system is before (leading) the reference signal. If it’s sloping downwards it is after (lagging) your reference signal.
The way I used to remember this when I first started is to imagine a mountain with a flag on top, and a climber trying to reach that flag. The flag is the internal measurement reference, the mountain climber trying to reach that flag is your measured signal, and the slope is the angle of your phase trace. Before the climber has reached that flag — i.e. the measured signal is before the reference signal — they’re on the ‘up’ slope. Once they’ve passed that flag — the measured signal is after the reference signal — they are now descending the slope. When the measurement signal and reference signal are arriving at the same time, the line is flat, like the climber reaching a plateau at the summit.
If you’re ever overwhelmed by phase, remember that even measurement systems and loudspeaker simulation programs do their work one frequency at a time
HOW TO USE IT
Nice information, right. But how do you use it? This phase trace is going to help you determine how two sound sources are going to interact when they’re added together. The important thing to understand here is that what you’re doing is comparing two individual phase traces to the combined frequency response trace of both signals.
This is a fundamental concept in sound source interactions — i.e. phase responses of those individual sources will help determine the outcome of the frequency response of the two signals combined. We should already know if we add two sine waves that are out of phase (180°, 540°, 900°, etc) we should get a complete cancellation. If they’re in phase (0°, 360°, 720°, etc) we should see an addition.
Let’s look back at the 1ms example. If we just look at the 1ms phase trace and think what would happen when one source arrived at a point exactly 1ms later than the other source, every time that trace hits the 180° mark, we should see a cancellation, and every time it hits the 0°mark we should have an addition. This is what we call the comb filter, and if you’ve read the first tutorial in this series, you should be familiar with this already. To see this occurring on the screen, start by resetting your processor delay, then set your measurement delay so you’re back to 0dB in the frequency graph and 0° in the phase graph. Now add the second channel in your processor/DSP.
Don’t touch the delay yet. Your measurement trace should now lift by 6dB in the frequency graph but remain at 0° in the phase trace. If it doesn’t, the delay (or polarity) between your two channels is not identical. Now add 1ms to only one of those channels on your measurement system and you should see a very nice comb filter. Don’t bother paying attention to the phase trace once both channels are mixed together.
As an experiment, leave your internal reference delay where it is, and give one signal 3ms delay and the other 7ms delay. Measure these individually without changing the internal measurement delay and capture the traces. Now you’re comparing to more than the 0° line, so you’ll need to compare the two traces to see how the two sources will interact. Overlay the two of them and look at where the phase traces cross over each other. At all these points of intersection the two signals are in phase and summation will occur. Wherever the traces are 180° apart (e.g. -50° vs 130°) then cancellation will occur.
Now let’s go to our basic polarity inversion. Can you guess what happens to the phase trace of a delayed signal if the polarity of your signal is flipped? Any time we have a polarity inversion between two sources, the phase trace will be the same shape but 180° out at all frequencies. One great use of the phase trace is spotting polarity inversions in signal chains, especially when measuring multi-way loudspeakers.


DELAYED GRATIFICATION
Now let the experimenting begin. Start playing around with both the signal delay and the reference delay. Get a feel for how the trace reacts. If you’ve got someone with you — put your reference delay to an arbitrary amount and get your partner to add delay to your measured signal (and not tell you the amount) both above and below the original amount. If you’re okay with maths, you can actually calculate what that delay was just by looking at the phase trace. If not, just try and get a sense of when your measured signal is getting close (i.e. within a couple of milliseconds) as opposed to far off.
Start to also get a feel for how the steepness of the curve changes as the delay between the measured signal and the reference signal increases. Now add different delays to both of your input signals, measure them individually and before combing them, take a guess at how the frequency response should look when you add them back together. These types of experiments will not only get you ready to take your phase trace out into the real world but help give you a fundamental understanding of phase interactions between sources.
In the next article, we’re going to continue our journey into the world of phase and look at phase shifts that occur from changes in frequency response and how to use the phase trace to start to combine sources with different frequency ranges like a full-range speaker and a subwoofer. We’ll also start taking a look at real world measurements and ultimately learn how to use the phase trace to make your systems sound better!





I’m very grateful to Ewan McDonald for posting these series of articles. This is exactly what I have been looking for in trying to teach myself to tune PA systems and trying to learn how to interpret data from a recently purchased Smaart DI2. thank you so much. I’m looking forward to part 4 which I can’t find online anywhere, so I presume I hasn’t been published yet.