
How to Mic’ Guitar Amps in the Studio
Mark Opitz’s guitar amplifier microphone technique. Having worked with bands like INXS, AC/DC, Cold Chisel and the Divinyls, Mark Opitz, suffice it to say, knows a thing or two about recording guitar amps. Andy Stewart caught up with Mark at Studios 301 in Sydney where he revealed one of his prized techniques for capturing perfect amplified guitar sounds.
Having worked with bands like INXS, AC/DC, Cold Chisel and the Divinyls, Mark Opitz, suffice it to say, knows a thing or two about recording guitar amps. AudioTechnology caught up with Mark at Studios 301 in Sydney where he revealed one of his prized techniques for capturing the amplified guitar sounds. Rather than be secretive about the way he works, keeping the best tricks up his sleeve, Mark is happy to share his engineering experience. What follows cuts straight to the heart of good guitar amp recording technique, and is based on a day-long discussion with Mark at Studios 301 in Sydney, which was kind enough to allow us the use of the recording space for the day.
MIKING GUITAR AMPS
Mark Opitz: Okay. The first thing I want to show you is my reliable and, dare I say it, infallible mic technique for capturing the sound of a guitar amp. After I hit on this technique quite by accident years ago, my days of placing mics all over the amp and the room in the blind hope of capturing a magical guitar amp sound were over. Although I don’t expect people to drop everything they’ve been doing for this approach, for those of you who are less than convinced by your own guitar amp recording technique, this may be the solution to your dilemma.
I should start by saying that this technique in principle works regardless of the amp in question, whether it is small or large, loud or quiet, a Marshall or Fender. We’re only using a small, single-speaker amp for the purposes of this demonstration here (because that’s all we could find kicking around 301!), but this system is applicable to any amp, whether it be a Marshall quad box or a Fender Deluxe. The only difference is that if our demonstration amp contained more than one speaker, we’d first choose the best speaker in that box. In this case obviously there’s only one, so we can skip that process.


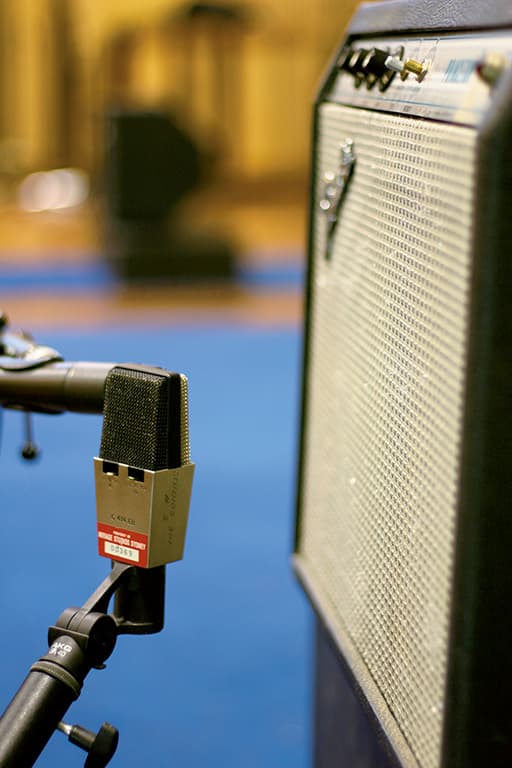
1. The critical aspect of this setup is to ensure the mics are placed at right angles (90˚) to one another. From above, the two mics form the tip of an invisible triangle, and this apex must correspond with the centre of the speaker cone.
2. The distance from the speaker determines the room component in the overall sound. Closer in achieves a tighter recording, further away increases the room component ‘heard’ by the mics.
3. Facing the amp from directly behind the two mics you should be able to see the centre of the speaker cone through the crack between them. To accurately see the speaker behind the mesh grille, use a small torch.
You’ll notice we’ve put a Shure SM57 dynamic in front of the amp, as well as an AKG C414 large diaphragm condenser – two quite different sounding mics. Our setup involves these two mics placed at 90 degrees to one another (the 90 degree angle helps maintain the integrity of the phase relationship). Unlike most single or multiple mic setups I see people constructing in the studio, you’ll notice that the two mics are placed on the imaginary line that marks the centre of the speaker cone. I do this so we’re capturing the top end from the centre of the speaker, but without facing the mic directly at it. Both mics are effectively at 45 degrees to the top end source (see below) whilst directly facing the body of the speaker cone. That way we’re capturing the top end in both microphones, but without a sharp, unnaturally bright edge to the sound that can be produced by pointing the mic directly at the speaker. We’re also facing directly at the bottom end emanating from the speaker. In an X/Y configuration, where the two capsules are exactly the same distance from the speaker and inside the radius of the speaker (i.e., closer to the speaker than the distance from the centre of the speaker to its outer edge), the mics will effectively be facing the two sides of the inwardly projecting paper cone.
The reason we’re using two microphones here is one of those happy accidents I came across in the ’80s when I was testing different microphones. At the time I was using a Sennheiser 421 and an AKG C414, but in the end I found the Shure SM57 worked better in this setup. Being a dynamic microphone, its mid-range is very, very good. The AKG C414 condenser complements the 57 by capturing top end and bottom end that the 57 can’t hear. So the effect you’re getting is like a dovetailing of the two microphone tones. If you want, you can use a Neumann U87 or a U47 Fet (or any large diaphragm condenser, provided it can cope with high SPL), but the reason I use the AKG is because it’s probably one of the toughest condensers ever made and, as you know, amps get loud! The AKG also has a 10dB pad on the microphone, so I’ll always pad it down – and always at the mic, never at the desk. If you’re dealing with a blisteringly loud amp like a quad box turned up to ‘11’ you need something that’s going to be able to handle that sort of power. We know the SM57 can handle it, we see them on stage on amps and drums all the time.
Once the mics are placed in their visually correct position, never assume that because a mic’s placement looks right it’s going to sound right. Make sure they’re working by bringing them up in the control room monitors panned to the centre (mono). Once the two mics are at similar volumes in the monitoring, flip one out of phase and fine tune their positioning until they start to substantially cancel each other out (the out of phase character should sound thin and horrible compared to the in-phase tone). Then flip them back in phase and bang! There’s your guitar sound. I’ve always found that this particular miking technique is instantly effective. One thing I can’t stand in the studio is arsing about getting a guitar sound, putting mics here, there and everywhere, trying different rooms and different mics. With this setup the sound you get out of the amp is exactly the same as the one you’ll get in the control room. And that’s always the hardest part in getting a good amp sound – simply capturing a sound that’s true to the amp.
AudioTechnology: Can you describe in plain English why the two mics are placed at 90 degrees to one another?
Mark Opitz: It’s because basically you want the signal hitting the diaphragm of each microphone at exactly the same time, i.e., phase coherently. Difference in phase, as most people would realise, is brought about by a discrepancy in distance between two or more microphones, a source and its capture – different lengths create different times.
AudioTechnology: Do these two mics usually act as one in terms of the mix? Meaning, were these mics sub-mixed down to one track on tape in the past?
Mark Opitz: Well, that’s what I used to do – but not so much these days because you’ve got lots and lots of tracks in the digital domain usually – but if you’re going to analogue tape I’d nearly always send the two mics to one track instead of keeping them separate. In digital multitracking, where there’s typically a plethora of tracks to work with, there are two things that I often do. One is, I put them on separate tracks because that enables us even further manipulation of the phase, by blowing up the wave form and tightening the in-phase characteristics. Although with this technique, nine times out of 10 when we blow it up it’s okay anyway. Another thing I always do now digitally is record a DI of the sound, but not for re-amping purposes. I do that for editing purposes. Of course it’s good for re-amping, but more importantly, if you’re editing a guitar track in a digital situation, to pick up the front end of the note it’s much easier to hear it off a clean DI sound than it is from a heavy distorted sound. The waveform is far better represented as well. So, for instance, if you’re editing you can listen to the DI and drag the mic channels around with it.
AudioTechnology: When you’re miking an amp with several speakers, does this technique always disregard the other speakers in the cabinet?
Mark Opitz: Always. Here we’re using an amp that only has one speaker. On a quad box, however, it’s a little different. You’re still only miking the one speaker, but the trick with the quad box is to find the right speaker. It’s amazing how many guitar players don’t realise that some of their speakers are not sounding as good as the others. And that can be determined, once you’re experienced with the technique, before a note’s played by examining the hiss that’s coming out of them. Years ago, for example, with AC/DC, I used to go through their whole rig, trying every Marshall head and every speaker box. I think every guitarist in the band had about four Marshall heads and eight boxes and on that particular album, Powerage, I went through and matched every head against every speaker until I found the right combination. And that’s not every speaker box, but every speaker! It took nearly two weeks to do.
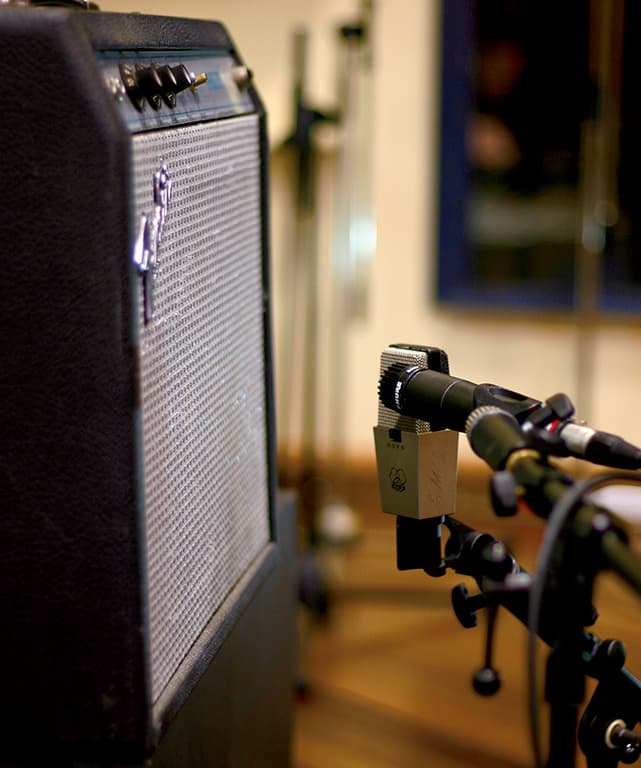
1. The combination of condenser and dynamic mics placed phase coherently (the same distance from the sound source) in an X/Y configuration provides a reliable and versatile recording quickly and easily.
2. An AKG C414 in combination with a Shure SM57 are often used in this setup, however by interchanging these mics with others a different tonal character can be achieved. Hi SPL-capable mics are a must close to the amp!
AudioTechnology: Is this with them in the room waiting for you to hit record?
Mark Opitz: [laughs] No, no. I had two weeks preparation beforehand, and that’s the whole secret to everything, the only magic trick – preparation. Actually, in that particular situation I didn’t use this technique then, I just used a good old Fet 47. That record predates this technique.
The thing about this X/Y technique is that you can play with it too – as long as you adhere to the principle and play within it. You can go right up against the centre of the cone or back the mics away… just so long as they remain in an X/Y setup and centred on the speaker. One of the crucial factors is that the mics must remain set up in front of the centre of the speaker cone. Otherwise the technique won’t work. It’s got to be dead centre, that’s the whole thing. What’s coming out of the centre of the cone and the edges of the cone has to reach the diaphragm of each mic at the same time. That’s how you get perfect phase. And when you look at the setup it’s actually incredibly simple and quick, which instills confidence in what the players are doing and confidence in the engineer.
But sometimes a close-miked amp sound is simply not the order of the day, and in that situation I’ll often add a Neumann U47 Fet placed at distance to back up this approach, rather than abandon it altogether. The only reason to add this mic is if you’re trying to get extra room ambience into the sound.
AudioTechnology: Wouldn’t it perhaps be easier just to move the 57 and the 414 back a bit than have that third mic messing up the phase relationship?
Mark Opitz: Exactly, but not too far back because you’ve got to remember once you start moving back the focal length of the speaker’s going to change. We’re relying here on the physical aspects of the speaker. You can only work in the confines of the speaker setup, and there’s really only a 10 to 20 percent leeway to work with. You can’t drop them back as far as the placement of the U47. Get a torch, look at the grille, set the mics up so the centre of the X/Y configuration is right on the imaginary centre line, turn on the amp, start playing, end of story. It’s very simple.
Thanks again to Mark Opitz and Studios 301.








This might be one of the best articles I’ve read on guitar amp mic’ing … and I’ve read a lot! Thanks so much, can’t wait to try it
Definitely the best article on miccing an amp. Thanks for this. I’ve been using a single condenser mic for as long as I’ve been recording and now I’ve added the dynamic is a night and day difference. Thanks for sharing your advice. It is very well appreciated
One of the first rules you generally learn about stereo miking is that the two mics’ polar patterns should not appear in each other’s acoustic shadow as it can mess with the stereo imaging.
I’ve just tried this and I can’t deny it sounded good, but as an experiment, I also tried it with the 57 above the 414 to keep them out of their respective acoustic shadows, purely to see what difference it made, if any. It definitely seemed to me to give a more cohesive stereo image this way and the wider I panned it, the more obvious it seemed to be. But if you’re not panning the signals to any great degree, it didn’t make a lot of difference.
I used the 414 in cardioid mode as I’m assuming that’s what Mark does (I didn’t notice any mention of this in the article) it would appear to make the most sense given the application & positioning.