

The Final Frontier: How to Record Space & Ambience
We clear the air on how to hear ambience and get the most out of what’s already in your studio space.
27 March 2017
Tutorial: Michael Carpenter
As audio engineers, we interpret the concepts of ‘space’ and ‘ambience’ in different ways to most people. We may use similar definitions — cold and harsh, or warm and intimate — but we’re not describing proximity to a heater, we’re talking about sound.
Ambience is manifest in our productions through the use of delay, reverb, room mics, spill, even psychoacoustics. They all contribute to a creative representation of space; whether it be true-to-life, or a fictional, stylised re-moulding of an environment as an effect. They’re also some of the most powerful and profoundly influential tools in our creative arsenal.
In this tutorial, I’ll cover the importance of understanding and using the space in our recording environments to create depth and dimension in our recordings. I’ll also look at the importance of spill, bleed and leakage; briefly discuss some of the electronic manifestations of ‘real spaces’; and touch on mic techniques suited to capturing particular senses of space and ambience.
ASSESSING THE DESIRED RECORDING SPACE
How can you tell if your space will record well? It’s actually a lot easier than you might think. We’ve all been in countless acoustic spaces throughout our lives, and though you may think you haven’t paid attention to what they sounded like, if I say ‘concrete parking station’, ‘bathroom’, ‘school hall’, or ‘wardrobe’ you would have a pretty good idea of the ambience in those spaces.
With focused listening, you’ll easily get a sense of the spaces you’re hearing on albums too. Initially, listen out for a few very specific details. Firstly, get a sense of the size of the space. The giveaways are the reverb time and the density of the sound. A long, boxy space may indicate a longer, narrow room with a lower ceiling, while a big, open neutral space may allude to a wider space with higher ceilings. The second element we want to focus on is the tone of the space. Is it bright and splashy, or muted and unobtrusive? The former suggests harder surfaces like tiled or wooden floors and harder wall surfaces, while the latter implies carpet or rugs, and curtains on the walls. However, remember that there are also big muted spaces — for example, some churches — as well as small, bright spaces like bathrooms. The third thing to listen for is whether the ambience is being excited by single instruments in the way drum room mics are, or the collective spill of multiple instruments.

With this investigation underway, we can start matching ambiences to our desired production aesthetic. There are two ways to go from here, and we’ll look at both. We’ll start by looking at potential recording environments, whether they’re particular studios or other unconventional spaces. Of course, we may not always have access to the exact spaces we’re hearing in our head, so it’s also important to understand the different post production reverb and delay effects available [see Reverb & Delay Options sidebar].
When assessing potential recording spaces, it’s not hard to get a sense of what they sound like. A very good friend of mine once told me that the best way to know how a space will behave is by talking in it. We’re used to how our voice sounds in every environment we’ve been in. Our brain has built snapshots of those so we can quickly recognise the ambient quality of spaces against previous reference points. And, yes, a hand clap or two helps as well.
You can then formulate a plan using your ambient research: imagine how a drum kit would sound; conceptualise where you’d put the band members; envision how to use qualities like distance and spill to achieve the ambient energy you’re after. Take in anomalies, like the hard surfaces of windows and funky-shaped corners, as potential ambient ‘points of interest’. Look around for deader points in the room you may be able to partition off to have a variety of recording spaces. The possibilities are endless, but they need to be focused, which is difficult if you haven’t done your homework.
RECORDING THE AMBIENCE
Now the fun starts! Capturing ambience can be as easy as recording whatever mic you have plugged in onto a vacant track, all the way through to advanced stereo miking techniques. The one thing you need is distance: sometimes a little distance, and sometimes a lot!
There’s a few things to keep in mind when thinking about distance, and how microphones ‘hear’ space. The first is whether we need the ambience to be captured in stereo or mono. A common problem in many tracks I get sent to mix is there’s too many stereo ambience tracks. For certain projects, that can sound amazing, but it often gives the effect of ‘closing up’ or confusing the stereo image. Many times I’ll either just use one channel of the stereo pair, or sum them to a mono bus (checking for phase) and pan them in a similar place to the source.
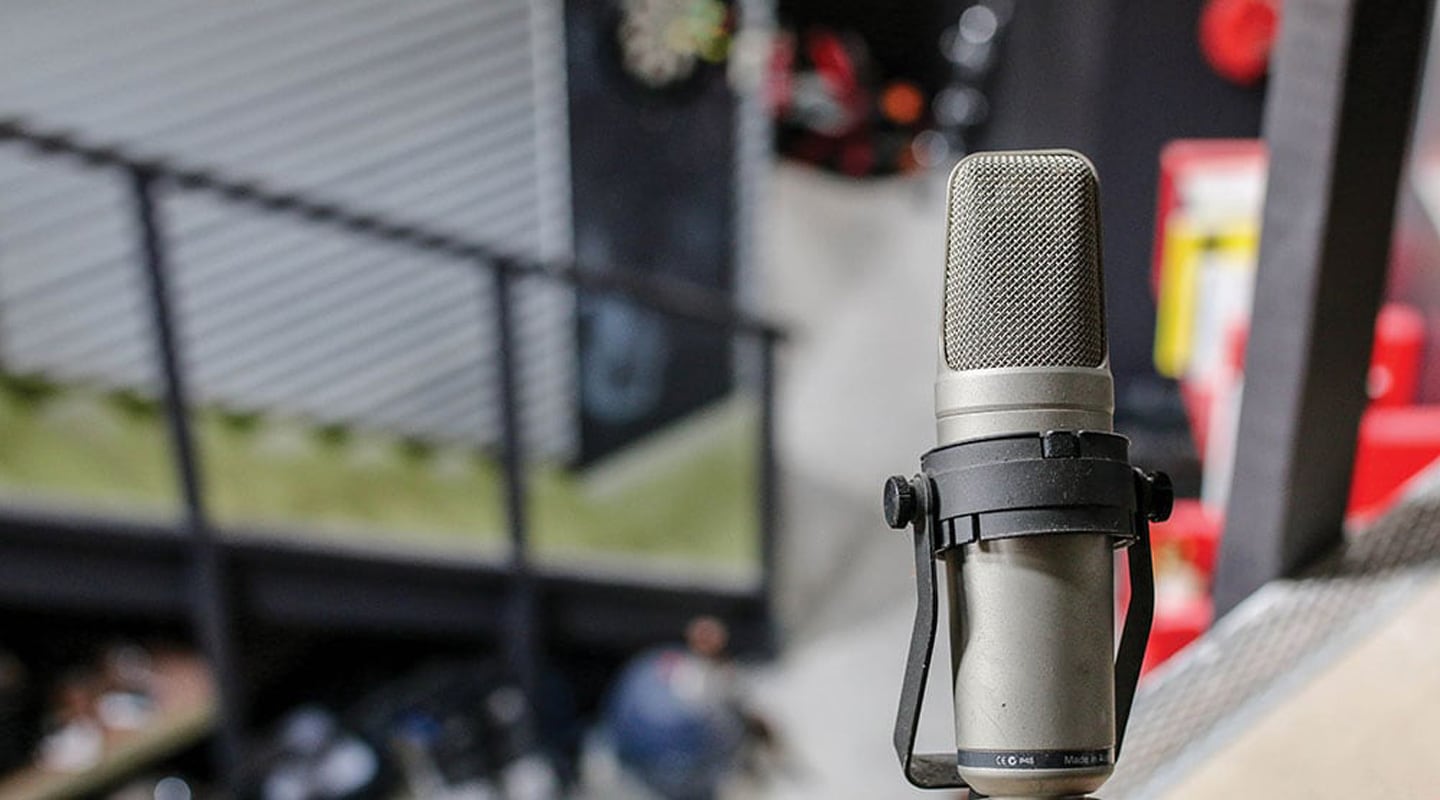
The simplest example I can give is with drums. We often want our drums to feel immersive and emulate how it feels to stand in front of a drum kit in a room with sound engulfing you from all angles. A stereo miking configuration is the way to go for that result. I’ll usually use an XY or ORTF configuration to more closely emulate the single perception point of the stereo image, though a widely spaced pair can be effective for giving the drums a larger-than-life sense of width [see Stereo & Distance Techniques sidebar]. On the other hand, we may want our drum room ambience to add substance and power straight up the middle of the mix. A single large diaphragm condenser in omni mixed in with the close mics — or automated in and out of sections of the mix — can effectively augment the power of the drum sound.
While you may think a reverb plug-in would do the same thing, there really is nothing like a bit of real ambience


TRY THIS: If you thought ‘re-amping’ a space is too difficult or arduous, think again. It can be really easy. It may be as simple as turning your studio monitors up in your ‘control room’, and recording it back through a mic or two onto fresh tracks (make sure the mic outputs are muted to avoid creating a feedback loop.) Another option is to run a long cable from your output (even a headphone output can work in a pinch) to a powered wedge in another room. Our common area at Love Hz Studios is a big old warehouse with a corrugated tin roof. It has a really lovely reverb time around 0.6-0.8s. We have a couple of large diaphragm condensers upstairs and occasionally we’ll solo some virtual instruments, just the snare and toms, or lead vocal, send them out to a powered monitor in this space and record the roof mics onto some fresh tracks in our session. It’s a sound that no reverb plug-in can truly capture, and usually only takes about five minutes to rig up!
I often record guitar amps in the same room the vocalist ends up singing in. More often than not, while the guitarist is tracking I’ll notice the vocal mic compressor’s VU meter dancing around and wonder what’s coming through the unused vocal mic. Opening up that channel I’ll hear an interesting combination of over-compressed ambience and tonal phase anomalies. This can work really well mixed in with the original signal, or, if it sounds too weird, I’ll go and move the position of the vocal mic — maybe point it up in the corner, face the glass, or change the pattern to omni — remembering to be vigilant with its phase relationship to the close mics. It can often give the guitar sound a subtle sense of size when a little is mixed in with the track, or more power when automated-in in sections. (Have a listen to mid- to late-period Queen records for that slightly ‘honky’ ambient sound on Brian May’s guitars.)
Another fun option is to put up a stereo mic combination to enhance or augment a lead vocal. I regularly use a ‘fixed point’ stereo mic, like the Rode NT4, Studio Projects LSD2 or AEA stereo ribbon a few metres in front of a lead vocalist, recorded on separate tracks. When mixing, it can be a really effective way to introduce a tonal point of interest (as in Heroes by Bowie) or give a more immersive vocal tone (as in the Solomon Burke example). A little bit of conceptualising and planning ahead can pay big dividends come mix time.
Also, don’t be scared to use whatever room you have as a reverb chamber. Soft synths and virtual instruments can often come to life when you send them back out of your studio speakers and ‘re-record’ their ambience on a fresh set of tracks. Don’t mic them too close though — maybe even point the mics in the other direction so you’re not getting much of the direct sound and capturing as much ambience as possible. While you may think a reverb plug-in would do the same thing, there really is nothing like a bit of real ambience. Plus, there’s something cool about hearing your own space mixed into a track for eternity.
Lastly, one of the most memorable learning experiences I had in regards to recording studio ambience was on my friend Kate Martin’s debut record about six or seven years ago (we even did an article on it in AudioTechnology). While Kate would be conceptualising an overdub on piano, guitar or percussion, I would walk around the room listening to how the sound was reacting to the space. It was amazing how moving my head down to the floor, or up to the ceiling, or facing away from the instrument would dramatically change the tone and the perceived effect. Once I found a place that spoke the best, I’d put a large diaphragm condenser in that spot. Often when mixing, I’d ignore the close mic and just use that sound. It was an effective way of creating space in the mix, and giving overdubs a distinct ‘composite’ sound.
The moral of the story is to expand your creative processes on the back of all your listening homework. Experiment with unorthodox miking positions in your space. With our unlimited track counts these days, it’s not a big deal to spend a little bit of time moving a mic around and recording it to another track to blend in with the original signal. Examine the tonal and ambient benefits of different microphone pickup patterns. See what a ribbon or dynamic mic will sound like instead of a condenser. Point the mic in the other direction to the sound source, and treat it as spill. All of these things will help enhance the perception of space in your productions.

TRY THIS: Don’t be scared to point the microphone away from the sound source, especially when combining the ambient mic with a close mic configuration. I particularly love this approach with harder sounds or hand percussion like tambourines. By pointing the mic away, you remove some of the harder transient tone and capture a diffused sound that is part original tone but mostly reflection. This is a really simple way to create depth. For bonus points, you could pan the close mic hard left and the ambient mic hard right. You’ll be amazed at how immersive this effect can be!
TIP: If you’re working in a smaller space and assume this article isn’t for you, you’re wrong. The feeling of space can be achieved in many ways. Spend time listening to how sound bounces off the reflected surfaces in your room. Glass is always great for capturing a different tone. I love putting mics in corners. Occasionally I’ll push a pencil condenser right up against the base of my lava lamp just to see what it does. My favourite trick is to tune an old bongo to the key of the song, leave it on the floor a few metres away from the drums, and put a mic in it while recording the drum kit. Even if the sounds don’t give a huge sense of space, you can always insert a reverb plug-in on the channel and set it to 100% wet. What this is essentially doing is using the tonal qualities of your unusual miking and extending them artificially to create a sense of space that might be a perfect means of giving depth to an overdub.

NO AMBIENCE IS AMBIENCE TOO
When I first started engineering, it was at a time when dry sounds didn’t exist on record. It was pretty much mandatory that you’d have a reverb on the snare, as well as room mics. The lead vocal always had a reverb and possibly a couple of delays, then you’d have another couple of reverbs and timed delays for special effect moments. I remember that all changed with Blood Sugar Sex Magic by The Red Hot Chilli Peppers and Wildflowers by Tom Petty. Both albums produced by Rick Rubin, and both albums were largely devoid of artificial ambience, though you can spot an occasional mono room mic on them. This introduced the era of ‘dry’ mixing — where heavier compression and tonal choices took over from default reverbs. I loved this development and embraced it wholeheartedly.
From a production point of view, even this complete lack of ambience can create its own sense of space, in a roundabout way. Things become a lot more focused in the stereo image. While you lack depth of field, you are creating a more precise sonic and spatial image. Then when you do introduce a room mic, it can have a massive impact. In essence, the sound draws you in by appearing so close, and can create a sense of intimacy, or power that is not to be dismissed. I’ve had a lot of success with juxtaposing an ambient sounding instrumental track with a dry, compressed vocal, placed front and centre in my mix. If you occasionally introduce a little of your stereo vocal mic on specific words, or sections of the song, it fools the listener into feeling like the singer dips in and out of the ‘space’.
MONO OPTIONS
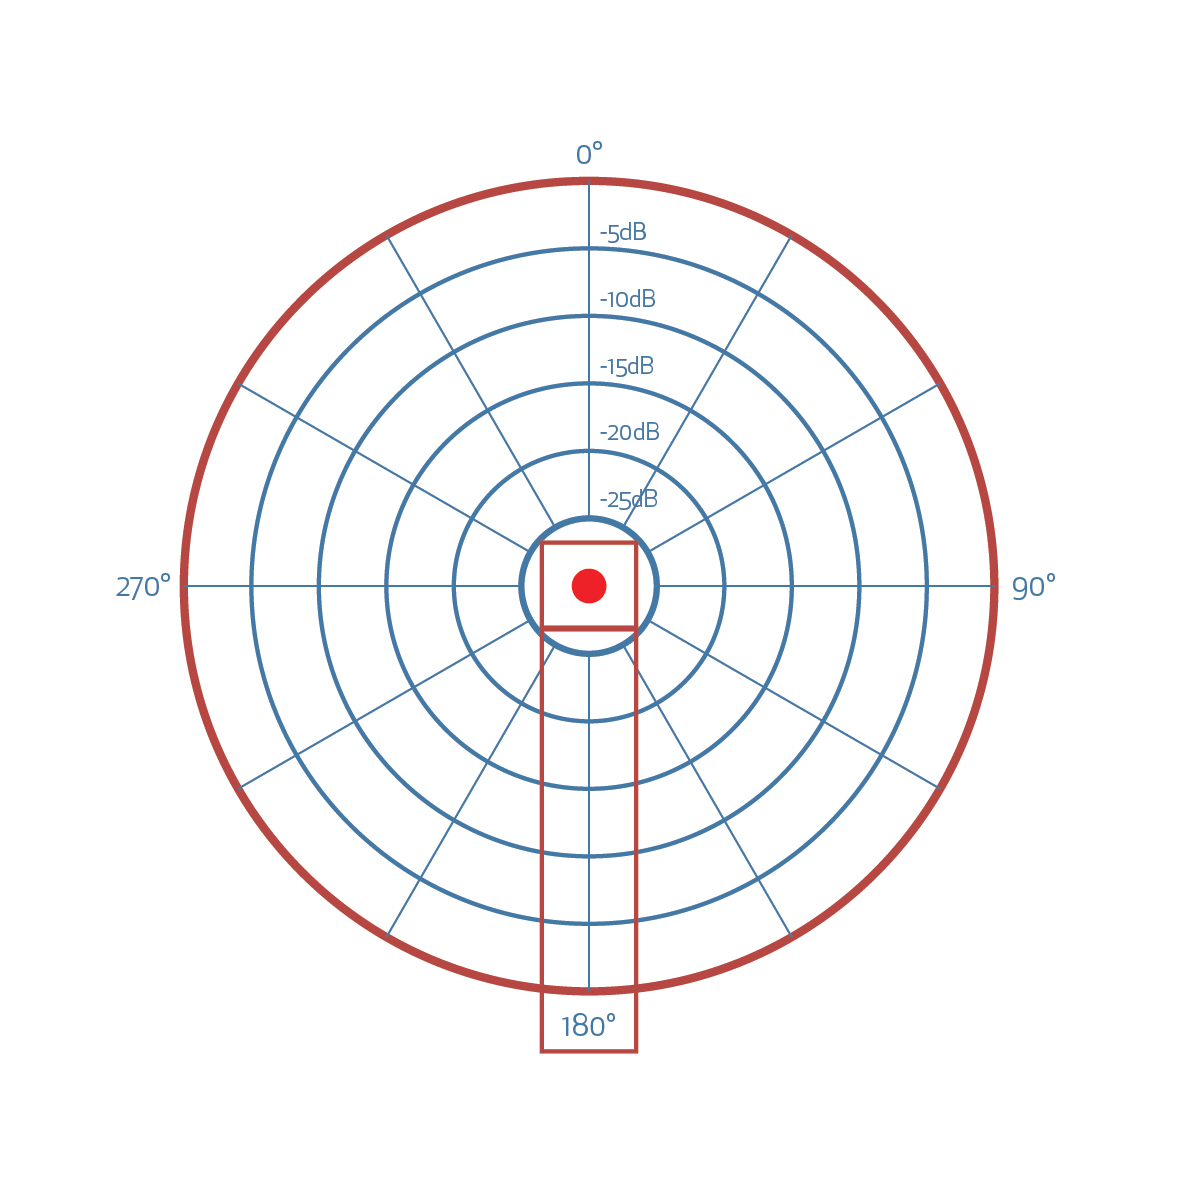
Omnidirectional — An omni pickup pattern isn’t only useful when you want to record four people clapping around one mic; there’s way more to it than that. The omnidirectional pickup pattern doesn’t exhibit proximity effect. It also has a much longer sonic ‘reach’ than a cardioid pattern as the integrity of the bottom end and the general detail of the mic stays intact over a longer distance. These are especially useful qualities for distance miking.
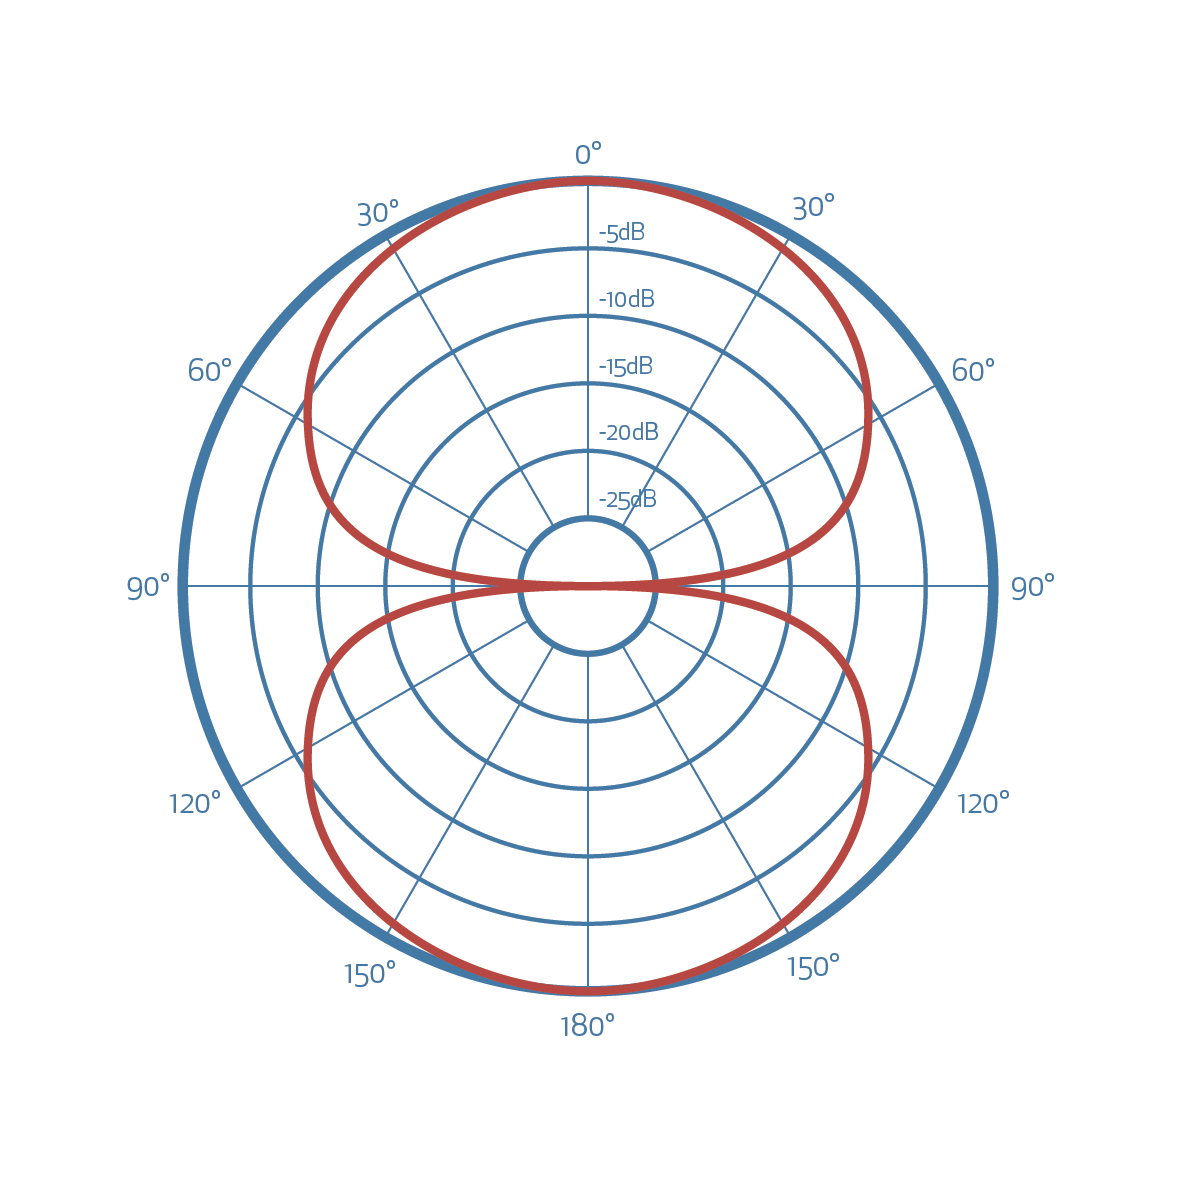
Ribbon mics — Part of the reason people use ribbons as ambient mics is they can soften the midrange of ambient sounds, as well as not being easily overloaded at a distance. Ribbons also generally take top end EQ really well, so it’s not unusual to add a little bottoms, scoop out a bit of the high mids (between 2-6kHz) and add a fair amount of air (around 10kHz shelf) to really make your ambient mics sound great.
STEREO TECHNIQUES
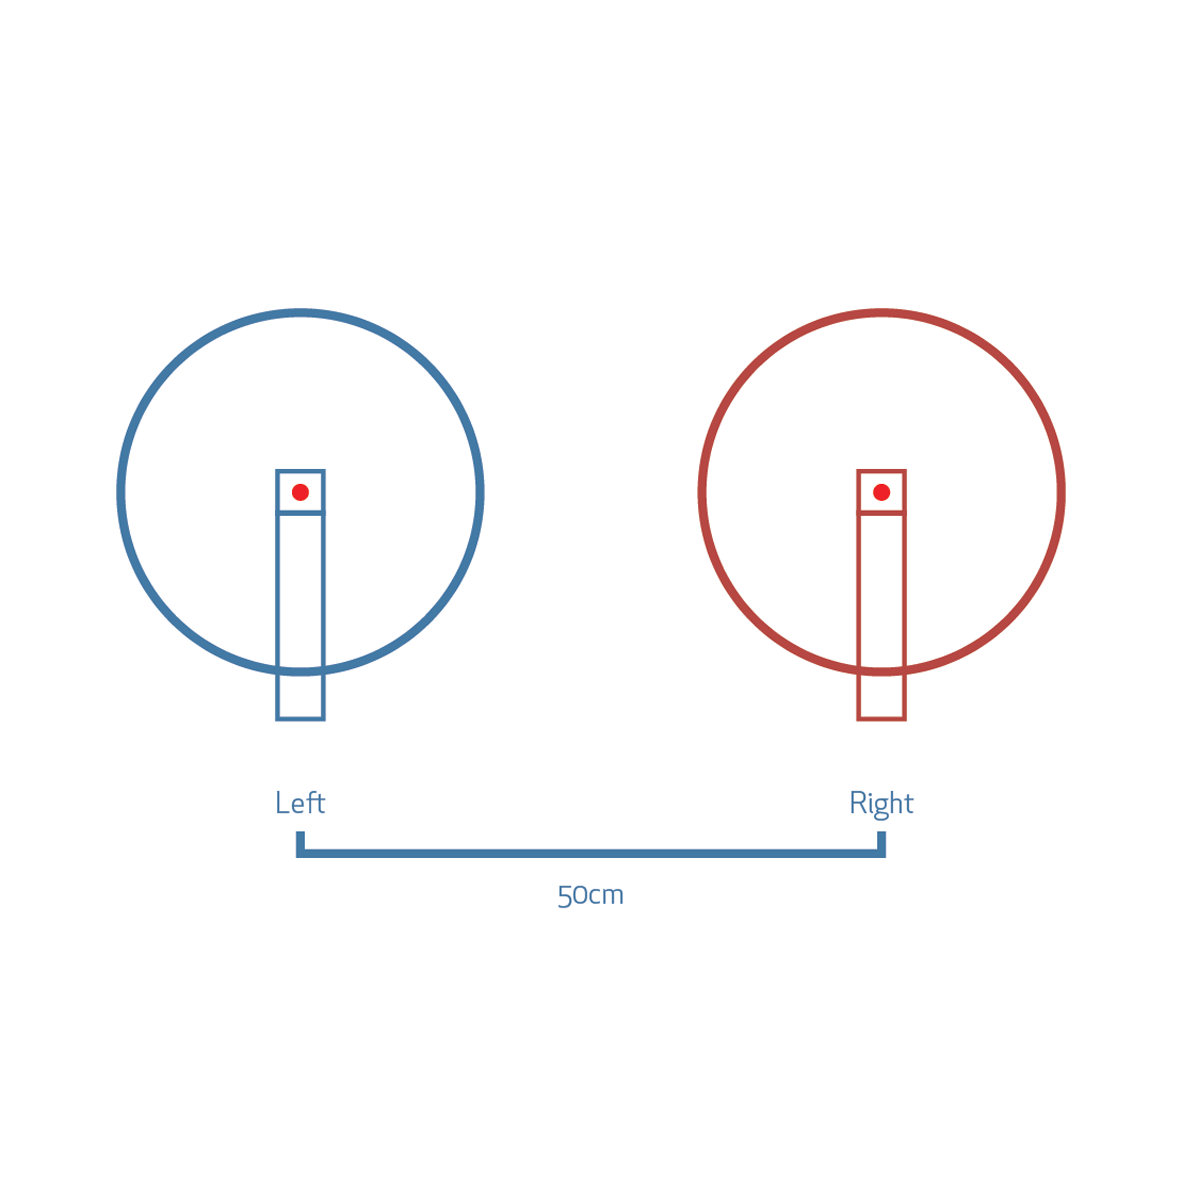
Spaced Pair (or AB) — This involves two omnidirectional mics spaced about 60cm apart, pointing in parallel to the source. Though the distance between the mics usually varies with the ‘size’ of the sound source. Beware of spacing wider than this, as your stereo pair will exhibit a ‘hole’ in the middle. This may be exactly what you’re after, as the close mics may provide the focus, while the ambient mics provide the width. Alternatively, place a third omni mic in the middle, mixed down below the left and right one to give the centre of your image more focus.
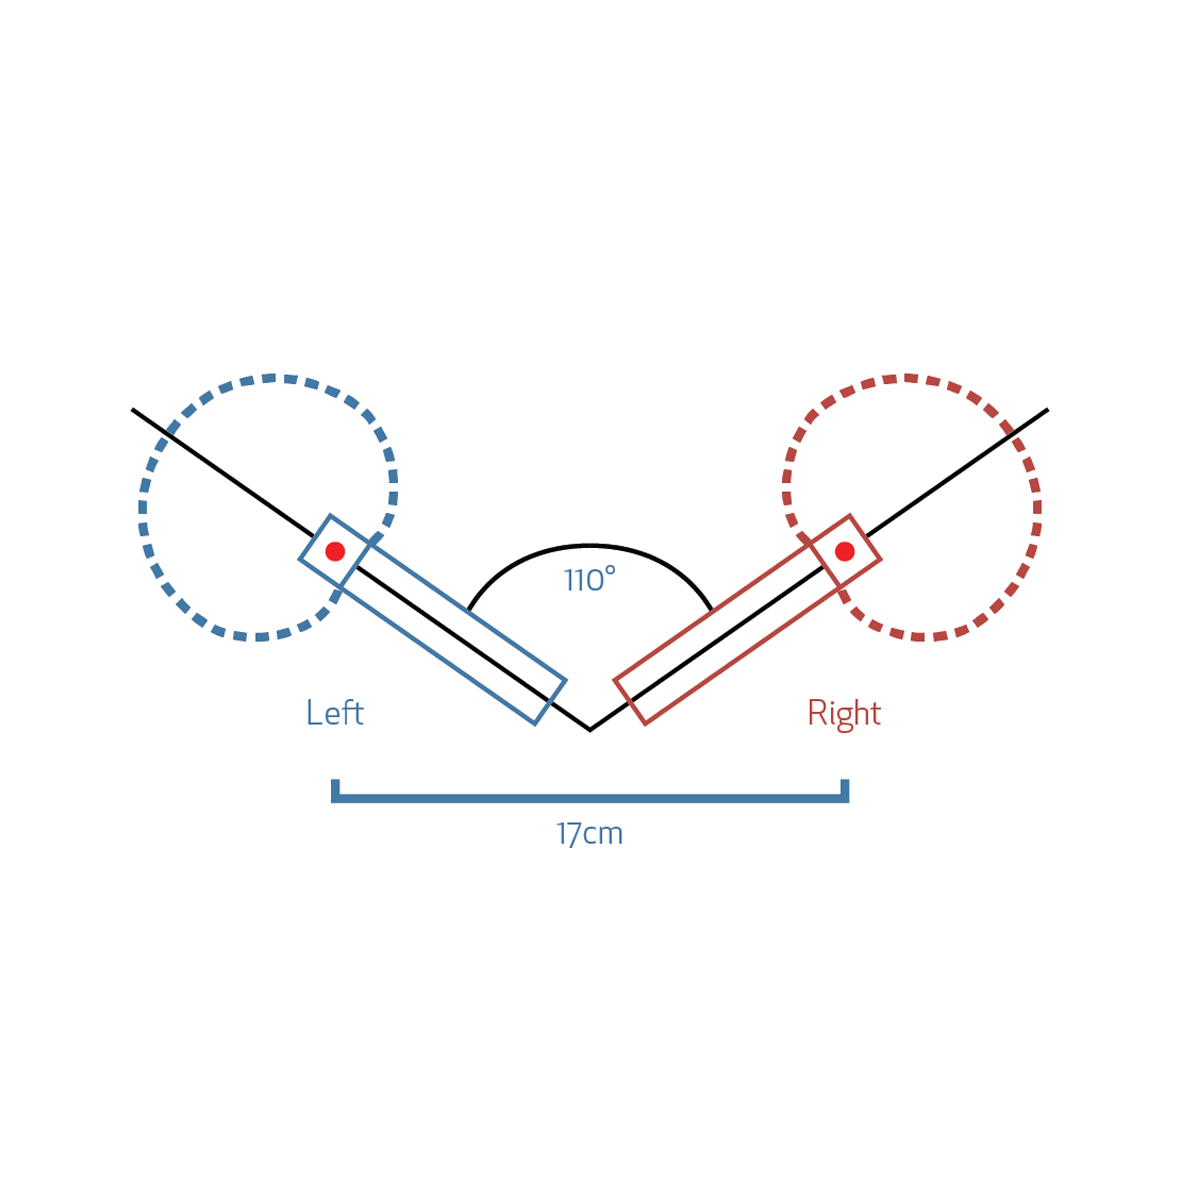
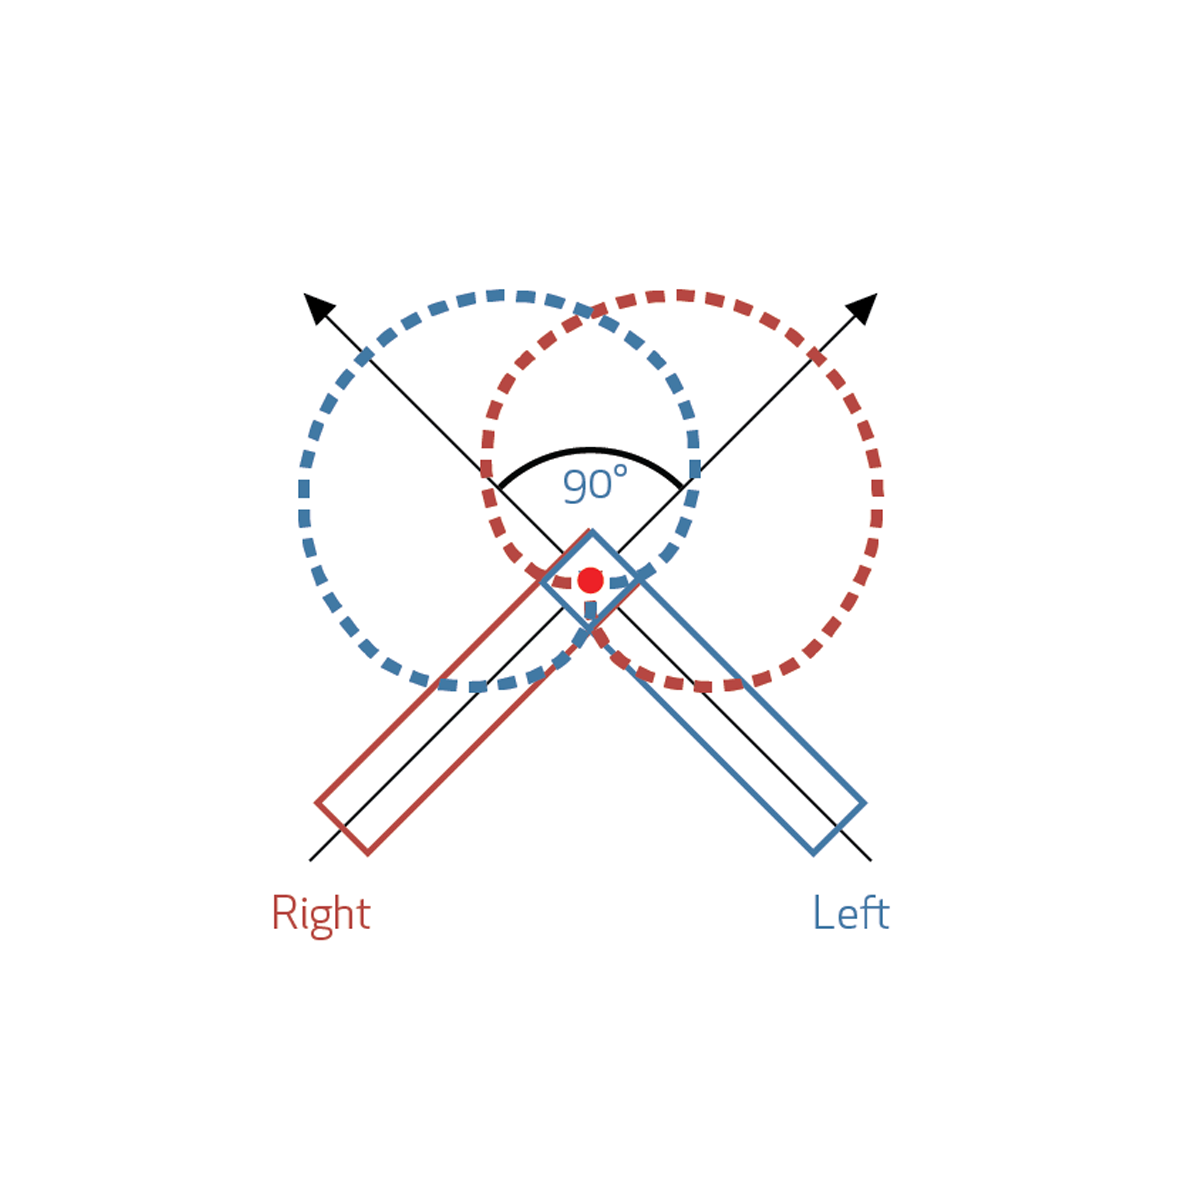
ORTF or XY — These are two different techniques using directional mics that I believe give a more realistic stereo image, though are not as ‘wide’ as a spaced pair. An ORTF configuration involves placing two mics at an angle of 110 degrees with a gap of 17cm between capsules. XY configures the two mics at between 90 and 135 degrees to each other, with the centre of one capsule directly above the other (coincident) to eliminate phase issues.
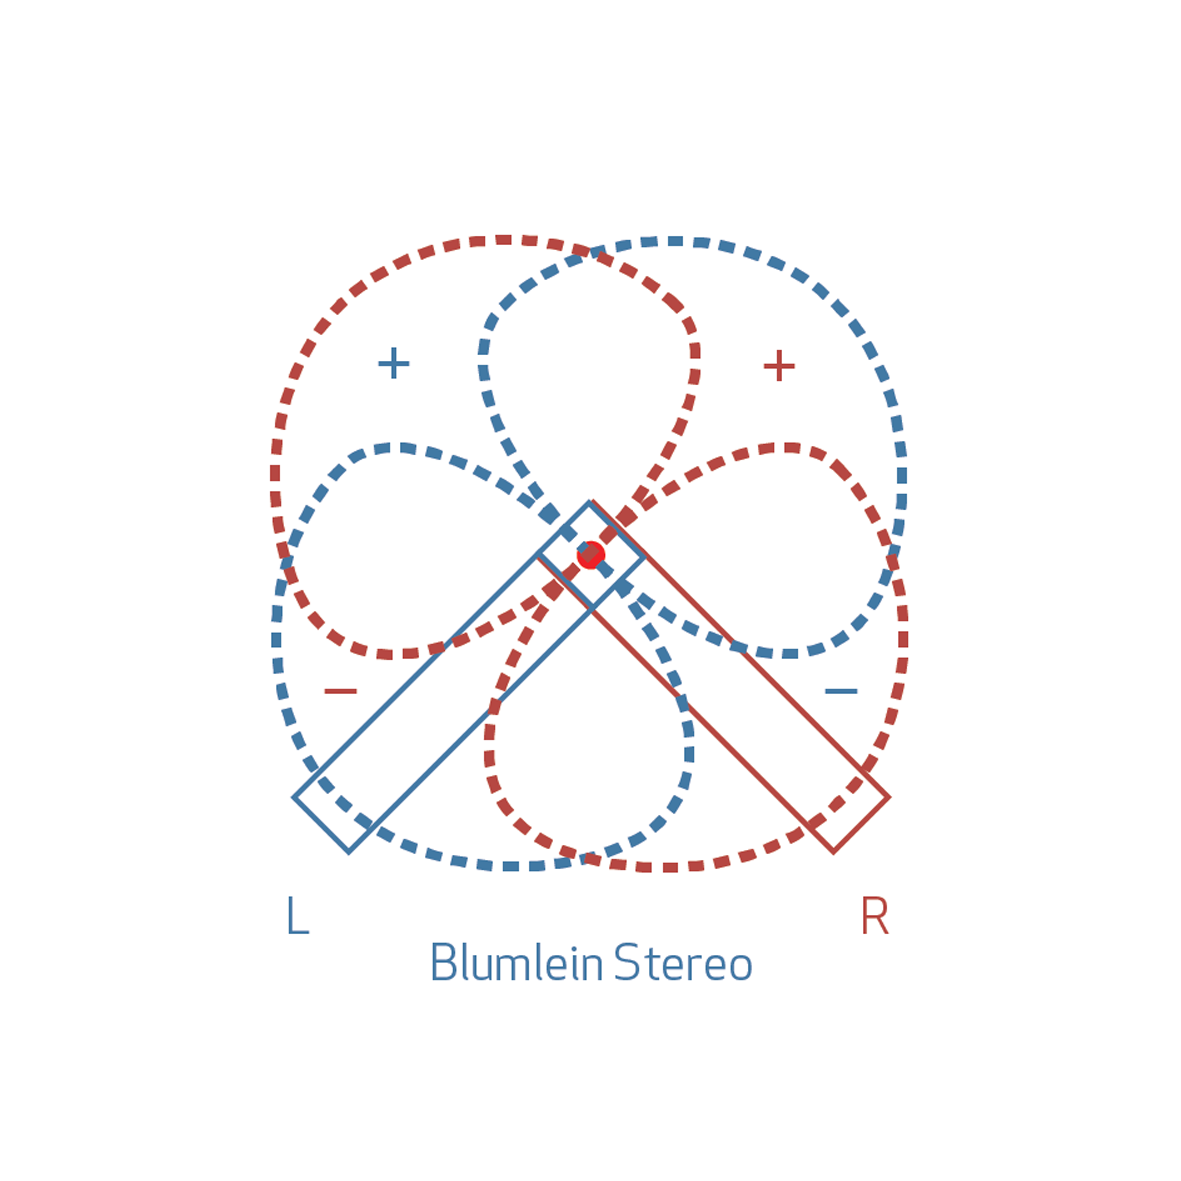
Blumlein Pair — This consists of two figure-eight mics crossed over in an XY fashion. This allows the two capsules to essentially be in the same point of space and allows precise stereo imaging. It’s great for capturing smaller ensemble and the space with just a pair of mics.
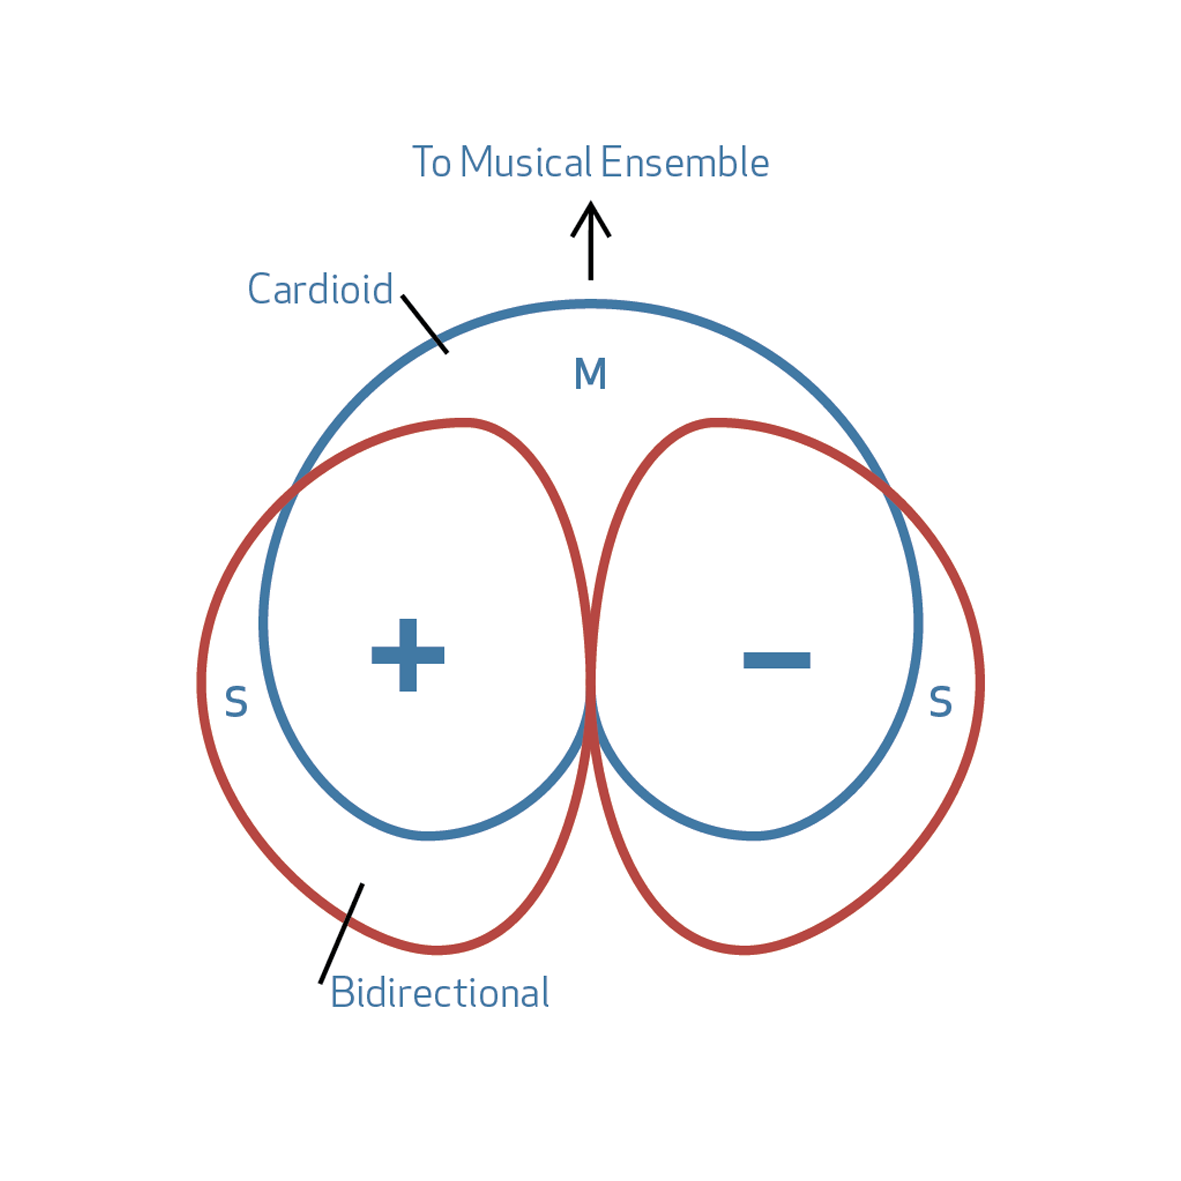
MS (Mid/Side) — This involves using a cardioid mic pointed towards the source for the Mid channel and a figure eight mic above or below it and rotated 90 degrees to capture the Side information. Once recorded, you can duplicate the side microphone and flip its phase to create a stereo side channel. By changing the blend of the two side channels against the mid channel, you can vary the perceived width of the stereo image. Mixing in just the Mid channel renders a mono signal, while just using the Sides results in wide stereo, allowing for an entire gamut of post production flexibility between the two.
There’s more — The list of stereo mic techniques goes on: Near coincident XY, Jecklin Discs, NOS, dummy head mics, ambisonics, even phased arrays. Read our Issue 115 cover story on classical legend, Tony Faulkner, who’s had phased array techniques named after him, to go deeper into the field of stereo capture.
THE FINAL FRONTIER
As you can see, there are a zillion variations on spatial techniques to explore. Remember to start by really listening out for how engineers have incorporated ambience on records – both old and new — whether it be real spaces or using plug-ins and automation. The idea of creating both real and hyper-real impressions of ambience has never been more achievable than it is now. You just have to be creative enough to capture it.
Michael Carpenter is a record producer/multi instrumentalist/singer-songwriter type, working out of Love Hz Studios in Sydney. He can regularly be found with his ear in a corner in his recording space.


RESPONSES